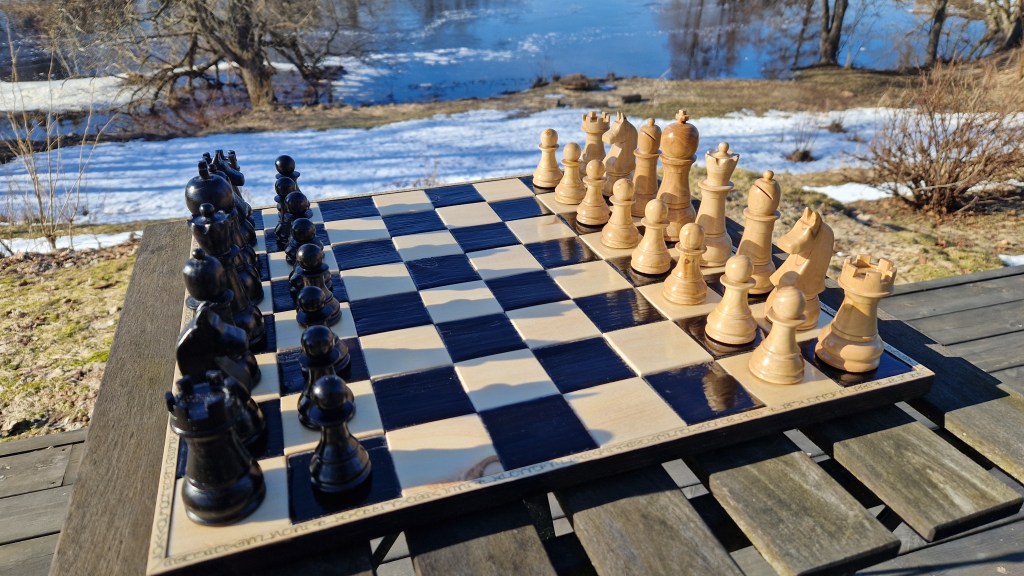
A few years ago, I finished a chessboard and thought I would quickly make the pieces and finish the set. Now, after several years and one epidemic, it is finally completed. Making a single piece is quite easy, and each one took around 2 to 3 hours to make. However, making 32 pieces with all the same types looking identical is really hard. But I am happy that it is finally done. There is a whole series of videos on how I made the set which I can recommend (this video covers most of the things in the blog with nice videography and a cool accent). Here is the first (links to the others be):
Most of the pieces were made from a tree in our garden that died from Dutch elm disease. I started with the pawns and quickly realised that I need a bit of help to make the pieces look the same. I made a simple pattern transfer jig which worked very well. However, after a bit of practice, I got more confident, and by the end of the pawns, I stopped using the jig and made the rest of the pieces by only referencing a sketch of the other pieces already made.
Most of it went well until I made a king that looked like he was malnourished. At this stage, I was making one piece every few weeks but stopped completely. The chess set just sat in the shop as a sad reminder that I have an uncompleted project for almost 4 years. Instead of me working on it, I complained about it on the woodworking subreddit, and the response was so nice and supportive that I made a new king a few days later. This king looked kingly, and I got working on finishing the chess set.
I went on to make the knights using a jig and a scroll saw.
With all the pieces complete, it was only a matter of adding a few details, staining, adding weights and feet, and it was done.
I made a quick detour to make a rotating display stand for the sole purpose of filming the chess pieces (plans available here).
And with that, I have a completed chess set. I am currently playing correspondence chess, but if you are in the neighbourhood, pop in for a game!
Just over one year ago I saw a post on Reddit detailing how to build a DIY vivarium for a snake (album here by u/leftthegan). I was inspired by this post to make my own vivarium and started planning it immediately. As with many of my projects it grew a bit larger than I originally anticipated. In the end I made a small indoor greenhouse with a volume of just under 800 liters.
Fauna and Flora thriving in the vivarium.
Housed inside are several different orchids, two dart frogs and many other plants. The vivarium is bio-active meaning that the system is partially self sustaining where waste (both plant and animal) is broken down by detrivores to serve as nutrients for the plants. I do however need to add water (daily misting) and feed the frogs. The vivarium is also linked to a Raspberry Pi to automate a variety of things such as the humidity, temperate, air circulation, day night cycles etc.
I made a whole video series on how I build the vivarium (watch the entire playlist here). It is narrated and I think I provide most of the information for anyone to make something similar. Following is all the videos with a bit more information on each:
The main structure is a wooden base and frame with glass doors on both sides and two glass doors. One thing I would change is to have the back doors and one side replaced with a wooden backing and decorated it with some natural background to which the creeping plants would better attach.
I wanted to make the roof completely enclosed to keep the humidity high. I also used low wattage LED as lighting to ensure that it does not become too hot. It seems to be working reasonably well. The lighting can also be switched off in stages. The temperature is monitored at 10 minute intervals and if it increases too much parts of the lights are switched off automatically. This only happens on the warmest days in summer (I also discovered that I can cool the whole vivarium by one degree in 10 minutes by placing ice below the lights and turning on the internal fan).
There are a total of 14 lights. Five are 210 lumens and ten are 500 lumens giving a total of 5840 lumens across the vivarium (they use just over 80 watts and do not generate a lot of heat). I measured the lux at the soil level at 2500-3000 lux.
There are 3 fans in the vivarium. They are 12 volt, 9 cm in diameter and run from a old 12 volt adapter (with ample amperage) in parallel – all connected via a relay to the Raspberry Pi. The external fans are turned on four times per day for a few seconds to draw in fresh air.
There is always a 2 cm layer of water in the base of the vivarium. I manually mist the plants every day and to ensure that there is not too much water I installed a overflow (and a drainage pipe). The base also houses pipes that allow fresh air to be drawn into the enclosure when the fans are turned on. I spent a long time planning the base layer to ensure everything could be installed neatly.
Everything is controlled with a Raspberry Pi using an ugly conglomerate of Python scripts. I followed a lot of online tutorials on how to connect the wires, sensors, camera etc. I also copied and edited the code from the same online resources to get everything working – all the resources I used are provided below.
The relay is an 8 channel relay. Six channels are connected to the 220 V AC power from a normal outlet. Three of these are connected to the lights. The other three are connected to normal outlets to which a humidifier and heater is plugged in (there is one spare outlet). Two channels are connected to 12 V DC and the internal and external fans are controlled by these.
As the lights goes on (in three stages) in the morning, one song from a selection plays softly to wake up the frogs (included in the selection are: “Morning Mood”, “The Banana Boat Song”, “Oh, What a Beautiful Mornin'” and a few others). The same happens at night (with a different song selection), as the lights goes out in stages. A mid day selection of songs also plays at noon. This part of the program is completely redundant and I don’t think the frogs notice. I also think very few people will read this bit. But if you did, know that there are only 4 people, 3 cats and 3 frogs that have witnessed this event. It does however provides me with a very small bit of entertainment every day.
A sensor reading the temperature and humidity is connected directly to the Raspberry Pi. A connected webcam that takes a photo once a day at the same time (see the time-lapse in the video dealing with planting). It is also possible to stream video from the webcam.
Four times per day the extractor fans are turned on for few seconds as mentioned. Afterwards the humidifier runs for a few minutes (and internal fan runs for a couple of seconds). The external fans are also turned on for a few seconds when the temperature is very high. The humidity and temperature are measured every 10 minutes and these adjustments are made as required.
I also interface the Raspberry Pi with an app “Raspberry SSH” that allows me to control everything from my phone.
The humidity and temperature data is also pushed to a data to a service called ThingSpeak. A chart with the temperature and humidity measurements over the last day are available here.
Note that humidity seems to remain maxed out at 99.4%. I have 2 manual hygrometers that disagrees. I think wood, that the sensor mounted on, affects the reading. The wood absorbs the moisture from the air and ground and is always damp. Remounting the sensor on something less porous is a possible way to fix this.
I contacted a local glazier to have the glass panes cut to the right size and also sand the edges (sanding glass is something I really dislike to do myself). Each pane is 4 mm thick. There are fours sliding doors, two on each side. This allows for easy access to the whole of the vivarium. This was the most expensive part of the whole vivarium.
I did a lot of research on bio-active substrates before designing this vivarium and the base depth was planned with this in mind. There are thus several layers and, for now, it seems to be functioning well. The population of isopods and springtails are doing a fine job of breaking down the plant and animal waste as well as providing a snack for the frogs. The plants in the vivarium has changed a bit over the last year with some doing very well and some being replanted into pots elsewhere (some also died). The current plants in the vivarium includes:
Several types of fern
A species of coleus
Ficus pimula
Several species of moss
Soleirolia Soleirolii
Two other creeping plants
Chamaedorea elegans
I also added a few orchids:
Oerstedella centradenia
Paphiopedilum delenatii ‘Vinicolor’
Howeara Mini Primi
Bulbophyllum oreonastes
Paphiopedilum barbatum
I will add some more plants later this year.
Finally I got some frogs: Dendrobates tinctorius “azureus”. I bought three but unfortunately one died very shortly after he was placed in the vivarium. I am not sure why but I will always remember “Spotty”. The other two frogs (named “Piesang” and “Pynappel”), are doing very well.
I feed them once a day with fruit flies (I keep several cultures going to have a constant supply). I dust the fruit flies with minerals and supplements twice a week. They also snack on the isopods who venture above ground and the springtails that are always available.
They have grown a lot in the last seven months. At some stage I will try to determine which sex they are and probably get one more frog. And maybe they will breed…
I am very happy with the how the whole vivarium turned out. It does not require a lot of maintenance but there are several minor things that have been changed and will be changed (e.g. the python code, plants, watering regime etc). I do however spend a lot of of time looking at the frogs.
This has been one of my biggest projects to date. The next big project will probably be a cabin in the dead trees close to our house. Keep an eye out for it…
—
The cat tax (note the vivarium is cat proof – this is good as I often see them admiring the beautiful frogs).
The infamous Kwagga.
Lastly, here is a bonus video of how I spilled a whole jar of stain on my wooden shoes:
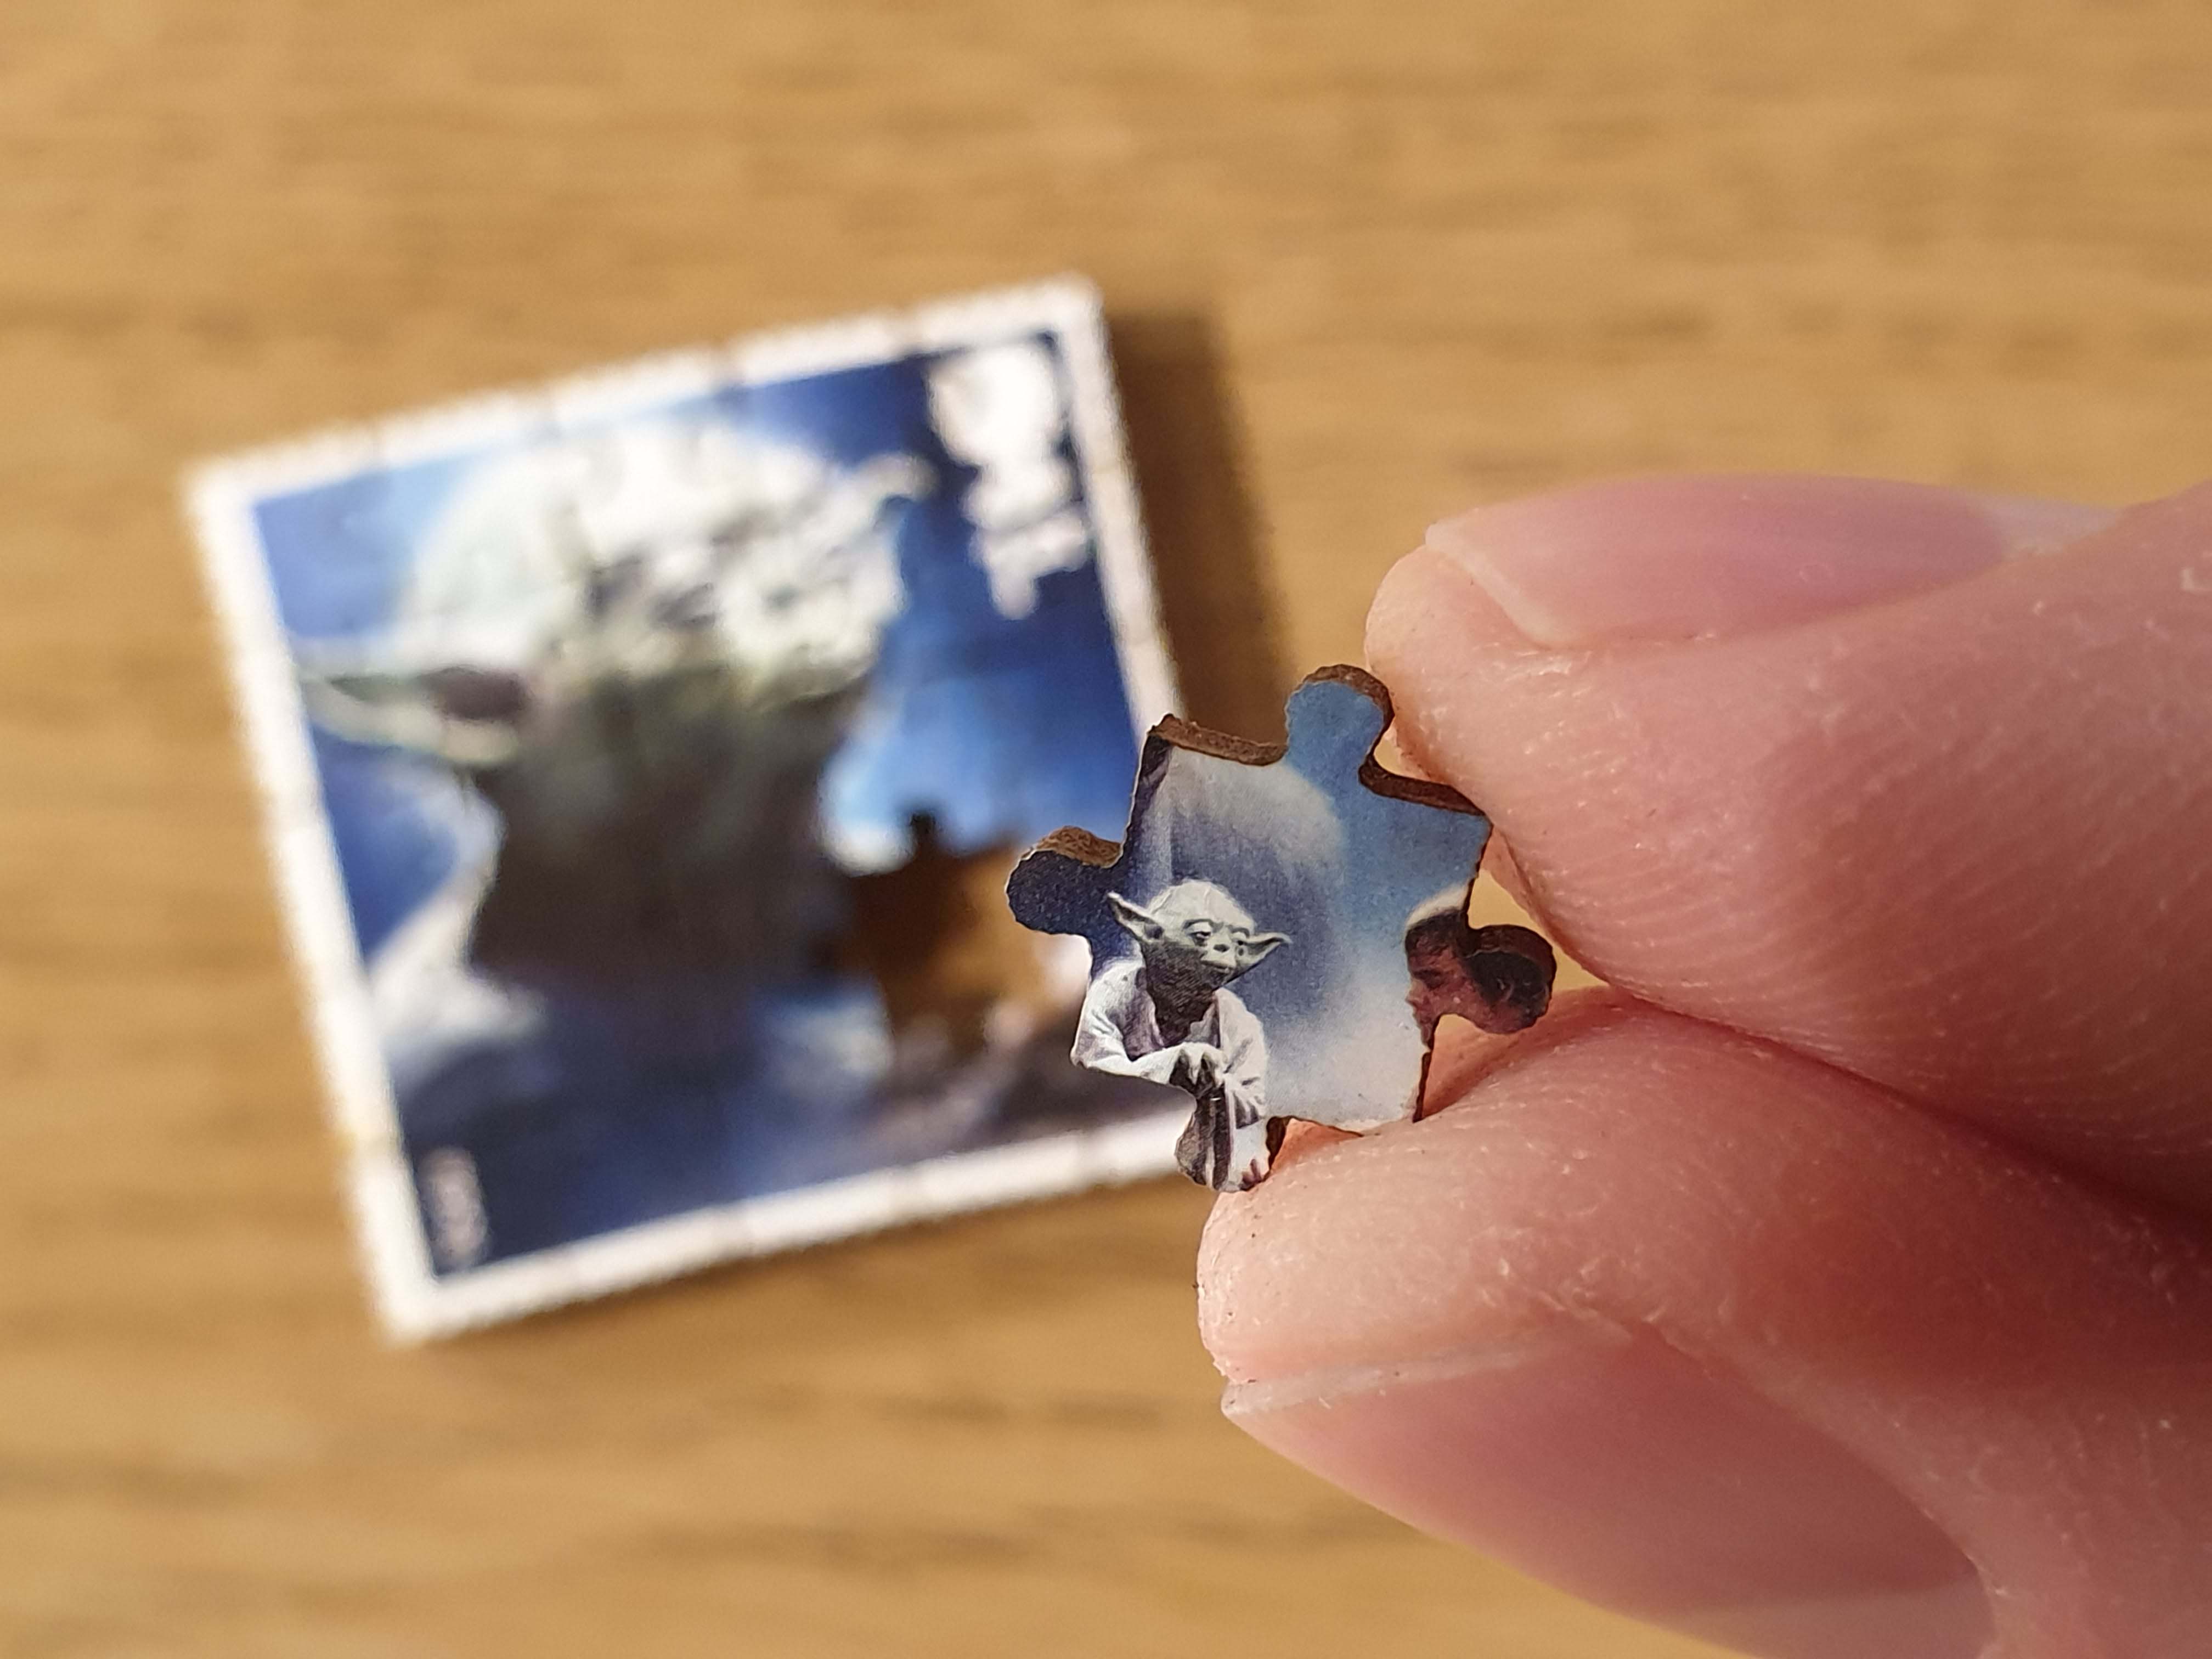
When I was a kid I collected stamps. After almost 30 years I rediscovered my old stamp album. On the first page the were the space themed stamps. I think these were the first stamps that I got – and if I remember correctly this was from a nurse at the hospital where my mother worked. In the album there are also a lot of South African stamps (this was were I lived). I am now continuing my collecting but also making small mini puzzles from some of the current duplicate stamps (some of these are for sale here).
Making a mini stamp puzzle is trickier that I thought it would be. I made some puzzles previously – using a scroll saw – where you just stick the paper to the wood and cut. But I wanted to use the laser to make the pieces really small. I need to cut them upside down to minimize the burn marks on the stamp itself. Positioning something this small exactly at the right place in the cutter while upside down required some thinking. The focus also needs to be spot on. But I think I got everything working quite well now and are happy with the results.
After I made a few single stamps puzzles I got the idea of making whole sets in to puzzles that can be displayed in a single frame. I got some really nice stamps from the Royal Mail. These include the 2019 Marvel set, the 2018 Star Wars Set and the 2019 Leonardo da Vinci sets. I have the Royal Mail’s Game of Thrones and Harry Potter sets still to make into puzzles.
I made the 2018 Swedish Lighthouses set into a puzzle set with an engraved lighthouse on the frame itself.
I also wanted to make a bigger puzzle but with small pieces. I got a image from an old book and made a 200 piece puzzle. It took more than 2 hours to build (more pictures here).
I still want to collect more stamp and thus posted this offer on a few forums and sites: I am willing to turn any stamp you want into a puzzle and send it back to you. I will however need 4 of the exact same type (one as payment and 2 for backup if something does not work – but I will keep the backup stamps also). I of course prefer not to cut stamps are not rare.
This project was a lot of fun. It provided me with a bit of a break as I am still struggling with the wooden clock kit – that is next on the to do list to finish. Keep an eye out for it…