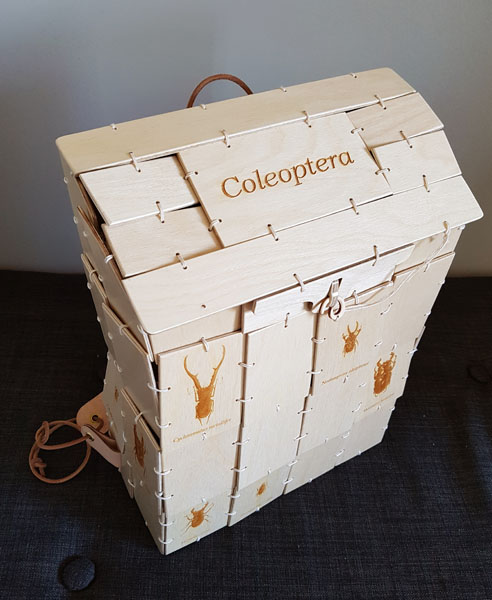
For a while now I have been working with wood and wanted to make bags using it as the main material. I found inspiration from the Japanese lamellar body armor used from the 4th century. Thus designed the bag to have around 60 pieces of wood all stitched together. It worked better than I thought and after a one prototype (see below) I was able to make a fully functional backpack. The stag beetles makes it an ideal bag for any professional or amateur entomologist (it is currentlyfor sale here).
Since I like insects I decided to display some stag beetles on some of the wooden plates in a similar fashion that insects would be displayed in a collection. Stag beetles are quite amazing animals and this is the closet I would get to ever collecting any.
On the inside of the lid I added some additional information of these creatures.
Inside of bag – some information on the lid.
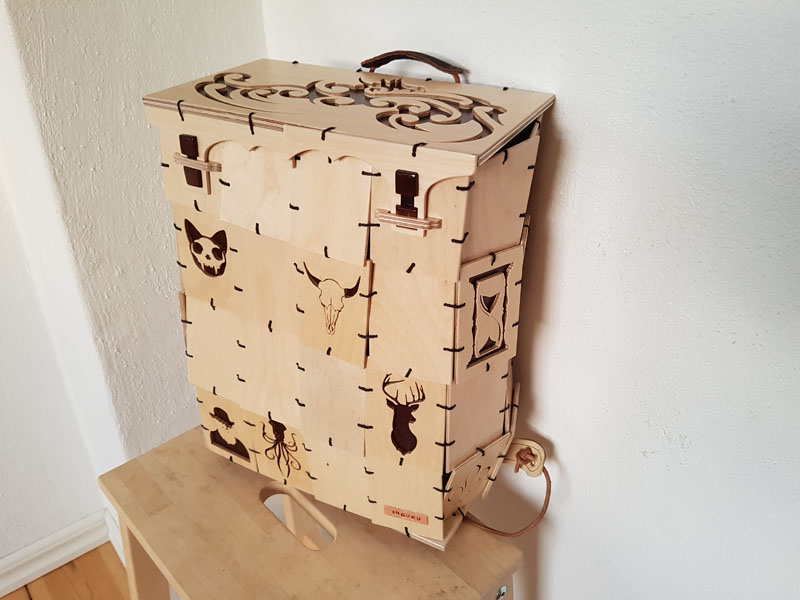
The lid lid and latch is my second attempt (see below). The multiple panels of the lid allows it to follow the curving top and the whole bag looks less like a box. The latch is very simple and locks in place with a small wooden spiral that is attached to the lid.
Beetle drawing for inside of lid
Stitching the lid
Simple latch and lock
The images are engraved on the bag and were partly inspired by a simple beetle from the first backpack I made. There are 16 beetles in total on the bag.
Scroll saw beetle from previous bag – see below
Engraving all the beetles at the same time
The bag is lined with a tough brown fabric. The straps are made from leather and attached with 4 mm leather cord. I left this quite long and can be shortened and adjusted to fit anyone.
The bag is approximately 36 x 27 x 14 cm (14 x 11 x 5.5 inches) in size and has an approximate volume of 10.7 liter (28 gallon). This will comfortable fit A4 sized books and laptops.
The wood is 4 mm Baltic Birch (some places – such as the bottom – I use 6 mm). Each piece has several coats of lacquer. The bag weighs just over 1 kg (2.2 pound).
There is one hidden image on the bottom that might evoke a smile from some. A few additional beetles might be found on other places in the bag.
—
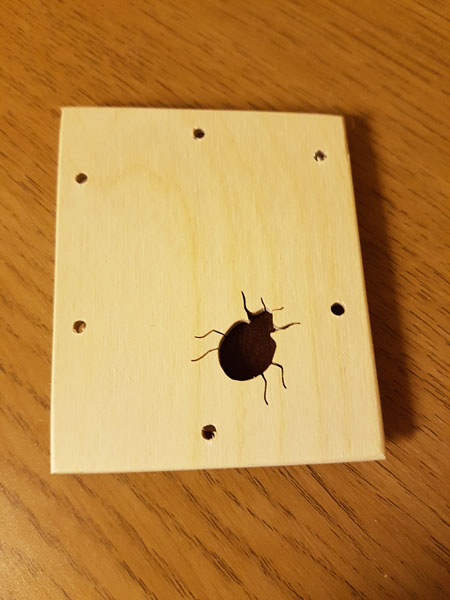
My first lamellar backpack was made mostly using a scroll saw to cut the images. The is square and the latches are not very easy to operate. It is also over 2 kg, twice as heavy as the Coleoptera bag. I am still pleased with it and will probably use it myself.
First lammelar bag
Second attempt
Below are a few more images of the Coleoptera bag.
I still have still many plates left and will make several bags from these. Any suggestions (or commissions) of what themes I should use on these bags are welcome. The next one however is already decided – hominid skulls. Follow this blog to see when it is done and if it is successful.
My wife, Carina, asked me to use the make her a card holder. She wanted one that could hold up to 8 cards, be as small as possible, have a sciency theme and her name and address on it. I thus spend a few hours looking at YouTube tutorials on how to make leather wallets to get some ideas, techniques and inspiration. This is the most complex leather item I have made (I made some leather printed chess sets and one very simple bag – but have very little other experience working with leather). I learned a lot during this project but also made several mistakes. There is also probably a lot that I did wrong that I do not even know about…and the next one will be much better. I do however like the way it looks and more importantly, Carina is very happy with it.
Update – I had several requests and thus made quite a number of these (with various images). They are now for sale here.
Here are a few a photos of the finished product.
Update: Here are some of the others I made one week later (get them here):
The first step is, as always, to generate a rough idea of what is needed. I measured some cards and sketched a rough idea of how is should look (while consulting with the “client”). I heard that my wife would like to have chocolate with this card holder and found the appropriate molecule on the web. I also found a site that allows you to write stuff using the periodic table (http://www.lmntology.com/) and made the image for the back.
For this card holder I use 2 tools that are not usually used together. The one is a laser cutter and engraver while the other is a Singer cast iron 1910 leather sewing machine. These machines were made more than 100 years apart. Both weigh a ton. I took one of them apart to clean thoroughly and added a bit of oil after reassembly. It is of course not necessary to have these machines to make a leather card holder.
I used goat leather that is approximately 1.8 mm thick. A small piece (32 x 15 cm) was cut and loaded into the laser.
The next step was to transfer the idea from the sketch to the computer (I used CorelDraw).
I final test print was made and showed to the client.
Three different engraving/cutting commands were sent to the laser. First the stitch pattern, where I should stitch (I am not very good at stitching in straight lines and this helps a lot). This is made as vector lines by the laser at very very low power. The stitches cover these lines. For the next one, I will only print these lines on one side and not on both.
Stitch lines
The second set of commands is engraving. Here the laser works like a printer by burning the images on the leather.
One line captured
The printing is immediately followed by the vector cutting of the leather to form all the pieces.
Inner leather pieces
Outer piece – slightly wet on the seam and left to dry folded over a stick
For the inner pockets (i.e. the pockets that ensure each card does not disappear into the leather abyss) I wanted to use silk. Silk is ideal in that it is very thin and do not ad much bulk to the card holder. I also found that it can be cut very easily with the laser.
A nice bonus is that the edges are sealed when cutting silk with a laser. This means that there there are no frayed edges and I did not need to add any seams.
No frayed edges
All the silk pieces
I used the ribbons of silk to make pockets for the cards that fit through the top 3 slots. I used contact glue to attach the silk to the leather. A strip was glued below the second slot.
Using a card I determined where the silk should be folded. The top part was glued the just below the third slot.
Determining where to the silk pocket
Again the silk was fold down to make the second pocket and the process repeated until all pockets was formed (for more details on how these pockets are made have a look a this video – this is how I got the idea).
All pockets done.
To contain the pockets I glued a piece of silk (only on the edges) over the pockets. Note that this piece is 2.5 mm smaller than the leather on each side.
Then it was off to the sewing machine to stitch the silk to the leather on the one side (the other three sides were stitched to the outer leather piece later, see below).
Stitching of the inner side done on both parts – test fit of cards
Burning and sealing of the threads – also learned from YouTube
Beautiful stitches made by a machine from 1910
The inner and outer parts were glues together and I briefly clamped them on the corners.
Everything was then stitched together.
Although the edges are quite nice when cut with a laser I wanted to seal the two stitched edges together. I made a burnishing tool from a piece of wood and used it to burnish the edges with a bit of leather wax.
Home made burnishing tool – made from a maple stick and nail and using a rotary tool and sandpaper.
Edges before burnishing
Edges after burnishing – seam still visible but the overall look is much nicer
The last step was to add some leather wax. I used a brush to do this and after a few minutes I wiped off the excess using a cloth and polished the leather a bit.
Leather wax added to one side.
The whole process, took about 3 hours. This includes the hour of making and testing the designs in CorelDraw and getting the right settings for cutting silk in a laser.
I will make more of these in the future and probably take commissions for customized leather card holders – let me know if you are interested 😉
I will also try using dyes on the leather – but this will of course need to be very light to ensure engraved images are still visible.
Overall I am reasonably happy and so is Carina.
Completed card holder with silk lined inner pouches
For a while now I wanted to start using Raspberry Pi computers. I finally got one and, as many people do, started to thinking about housing this credit card sized computer. After a few months I had a fully functional Raspberry laptop in a stylish wooden case.
Since I do not need such a stylish laptop I will sell it. If you are interested: buy it here.
While many people liked the Raspberry laptop, there were quite a few that would prefer their own, more powerful, computers housed in a similar case. I thus made a few cases inspired by this project (images here or buy them here).
I will probably buy another Raspberry Pi for some or other project but house it in a simple cardboard box.
—
How I made it:
As with many of the things I make, I have a idea of the final product in my head (or a extremely simple drawing with a few measurements – see below) but definitely not all the steps. During the building process I needed to make many changes and improvised a lot. In addition, many of the steps happened in parallel which helps to bring everything together at the end. The making of this laptop is shown in the series of videos and photos below. You can also click HERE to watch the full playlist on YouTube – but come back to read the interesting anecdotes and see more awesome pictures.
The making of this laptop started with a very simple drawing.
The main idea was to have all the components in one part of the case. The other side would open to show the screen and keyboard and also provide access to the compartment that house some cables and a mouse. The main problem was thus how to fit everything into the case. I also wanted a “nice box” and might have spent a bit too much time on the details. The 2 videos below show the making of the outer and inner part of the laptop case.
The top part quite thick relative to the bottom part, and if the laptop was not unique enough this would be a feature that would distinguish it from most other laptops.
Initial fitting of the screen and the large battery.
Most of the wooden components – pre assembly
Test fit of the internal components
Assembly of the outer case almost done
I liked the striped plywood sides and wanted to keep the same style with the latches. These parts took quite a bit of time to make (I could have used store bought latches and saved many hours). I am however happy with the design. Below is a video focusing only on how I made the latches.
I did mention that I wanted a “nice box” and a lot of small details were added to the case. Below is a video that show how these were made:
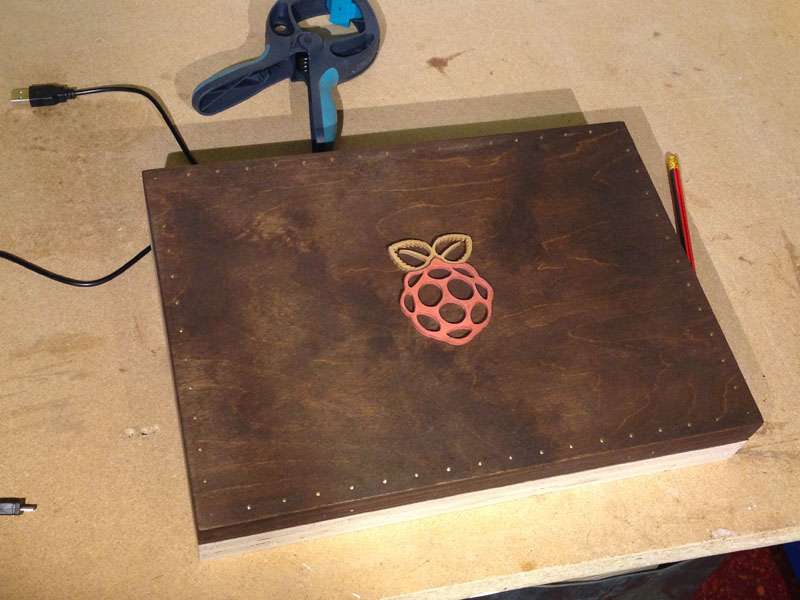
Logo added to the case – before lacquer
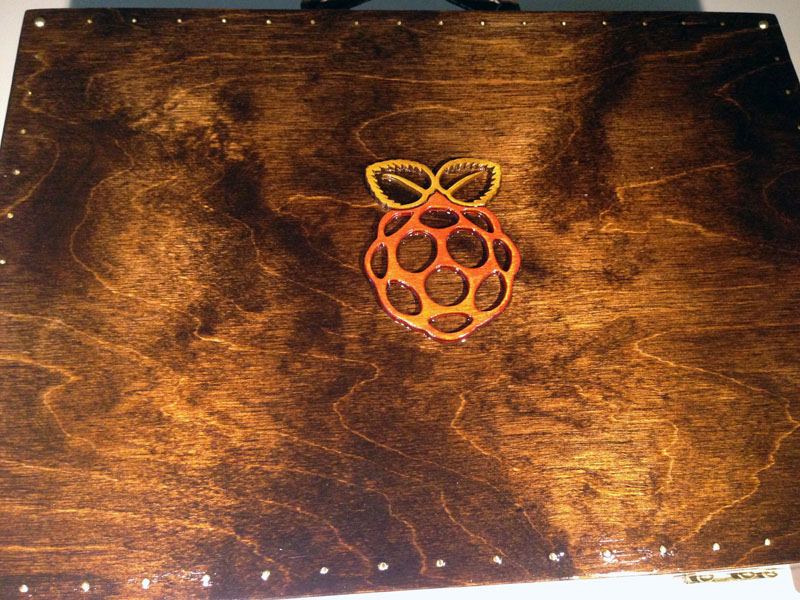
After lacquering
The whole case was finished with several coats of polyurethane lacquer.
Small parts were made and kept here until assembly
Closeup of the red feet
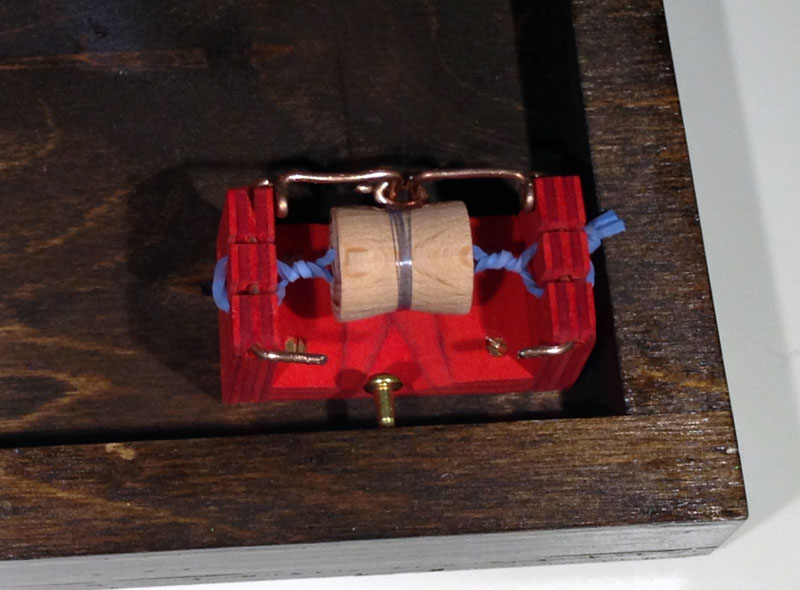
In addition to the feet I added a copper chain to stop the case from opening too far. I made a simple spool to retract the chain when opening and closing the case (can bee seen in part 2 of the video series). Below is a closeup of this device.
Simple chain retractor
The last part was the final assembly. At this stage everything was fitted several times and I mainly had to screw all the electronics in place one last time.
Everything in place
Finished Laptop Case
—
Problems and improvements.
After the laptop was completed I found that it was a bit tricky to link the earphones every time. I thus added a small mobile speaker to the inside of the case (there was just enough room next to the Raspberry Pi). It might however have been easier to just add an extension cable that is accessible from the front compartment to plug the earphones into – but it is nice to have some internal sound.
When opening the laptop the feet and chain stop it from opening too far. The feet are however just too short and the bottom lid lifts slightly before it stops (longer feet would however look weird). This is not problematic as such but it almost seem that it will fall over when opening – but never does. I fixed this problem in the laptop cases that work on the same principle (here).
I think a smaller portable battery would be sufficient. I never run out of power and rarely need to recharge. This would allow the case to be quite a bit smaller.
I find that the mouse and keyboard has a bit of a lag with the Raspberry. I am not sure if this is just because I am used to directly connected peripherals and fast computers or if I am just a bit impatient.
I will probable not make another Raspberry Pi laptop. The problems are also small enough to not change the current look of the laptop.
Specifications
More on the specifications of the Raspberry Pi 3 can be read here.
The screen is the official Raspberry Pi 7″ touch screen more information here.
The laptop will be sold with a Linocell Bluetooth keyboard (more information here) and a Plexgear wireless mouse (more information here). The mouse fits snugly in the front compartment.
It is powered by a EnerPlex battery pack inside the case (more information here). The battery is a Lithium Ion with a capacity of 10400mAh. The battery can be charged via a normal 5V USB (a cable is stored inside the back of the case).
A Streetz speaker is also included and sits neatly inside the back of the case ( more information here).
The speaker and keyboard can be charged with the internal battery and an a micro USB cable is also provided (and kept in the front compartment of the case).
Note, the links to the peripherals are from the companies where each item was purchased.
The size of the laptop is 33 x 26 x 7.5 cm
The laptop weighs 2.8 kg (all peripherals included).
—
As mentioned, I made some laptop cases inspired by this project. These house 13″ MacBook Pro laptops. Below are some images of these. More about them here or to see them in the shop here.