I found Clayton Boyer’s site with wooden clocks approximately eight years ago via videos on wooden clocks on YouTube. For a very long time I just looked at these clocks online thinking that it would be awesome to make one.
Here is the video of how I finally made one (it is currently ticking away in our living room):
In 2014 we moved from an apartment into a house and I started to set up a small workshop in the basement. One of the first tools I got was a scroll saw and very soon Carina bought me the plans for the “Number 6” clock from Clayton Boyer’s website. I was quite stressed about making it and getting it to work, but I started almost immediately in any case. After cutting two of the gears (the pinions) on the scroll saw, one (the wind wheel) on the band saw and a few other other parts I stopped. I was working during the day and during my spare time I started to make and sell wooden things that later became Induku Design. This was 3 years ago.
Recently, after just finishing the vivarium project, I was wondering what to make next I remember that I still had the clock to finish. Working from home and making wooden things as part of my day job, I was able to easily fit this into my regular work schedule. After starting almost 3 years ago I was able to finish the clock, most of the work being done in the last 3 weeks.
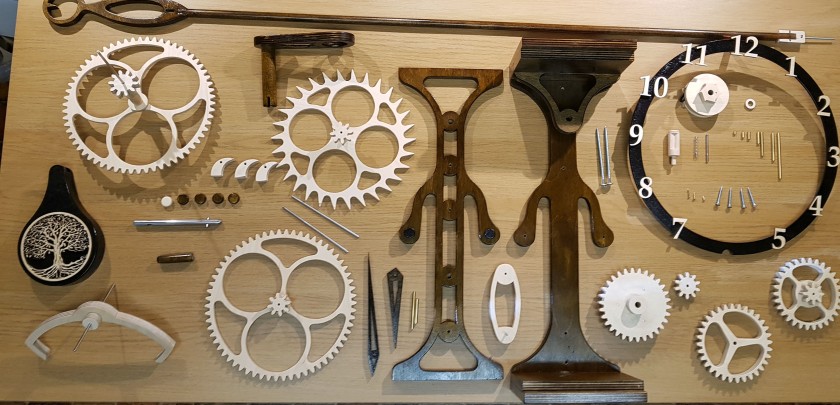
Most of the parts completed.
My initial worries about making a wooden clock was completely unfounded. The plans by Claton Boyer is excellent and the Number 6 clock is extremely forgiving. All the gears was cut by hand, and even so, it runs extremely smoothly. I did make some small changes to the design. This included adding a face to the clock and changing some of the features in the bob and pendulum’s design. But I think Clayton will be OK with me adding a few personal touches 😉
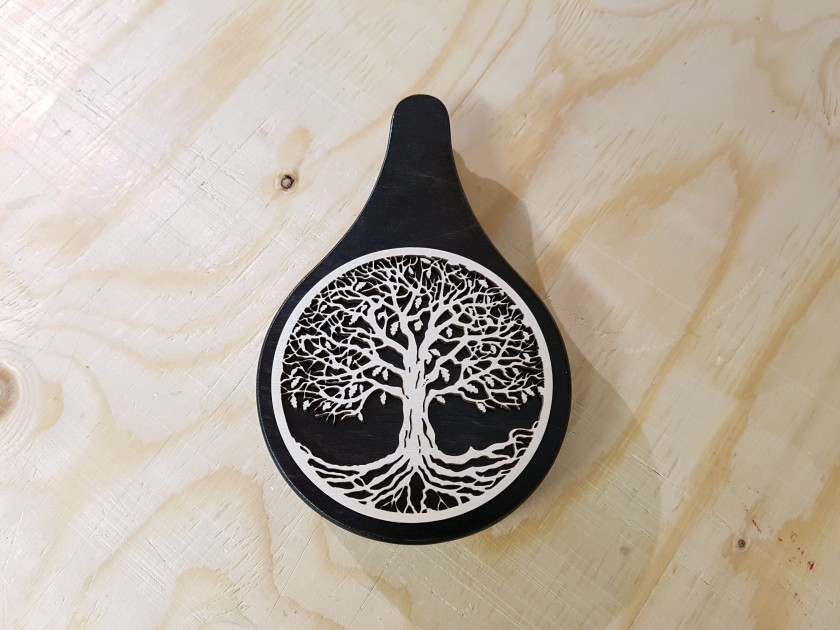
Customized pendulum bob.
I already had some people ask me why I did not use a laser cutter to make the clock and especially the gears. There are several reasons for this the first being that it is very satisfying making the gears by hand and seeing them work. I started this project making the gears by hand and wanted to finish it in the same way. It is quite relaxing putting on headphones while cutting and I actually enjoyed doing it. When I make a next one I will do it in the same way. The second reason is that the 12 mm wood is too thick to cut with a laser. Almost half the gears are 12 mm. I could potentially cut 4 or 6 mm wood and glue the gears together (there is a way to align them and actually not have glue on the edges) but I did not want to do this. The last reason is that I think the residue after laser cutting might be a bit sticky and interfere with the working. I do not mind the dark color of laser-cut edges (not the burnt edges when the laser has too much power), but removing it is quite a hassle. I did not want to construct the clock only to find out that I need to spend a lot of time on sanding the teeth (this may seem like a bit of a contradiction as I did sand the teeth after cutting by hand – BUT removing the whole brown edge is much more work than only shaping the profile and making it silky smooth).
In some cases I did use the laser cutter (but it is certainly not required for building this clock). The face made from 4 mm laser cut plywood. The picture on the bob is laser-cut with the most detail that I think I can cut into wood – this itself was a challenge since the leaves and their stems are very small and fragile. It took a lot of patience to sand and glue it without breaking it.
I used a laser engraver to draw outlines where to cut the parts on the wood. The normal method is to print the plans and glue the paper onto the wood. The way I did it is a bit quicker.
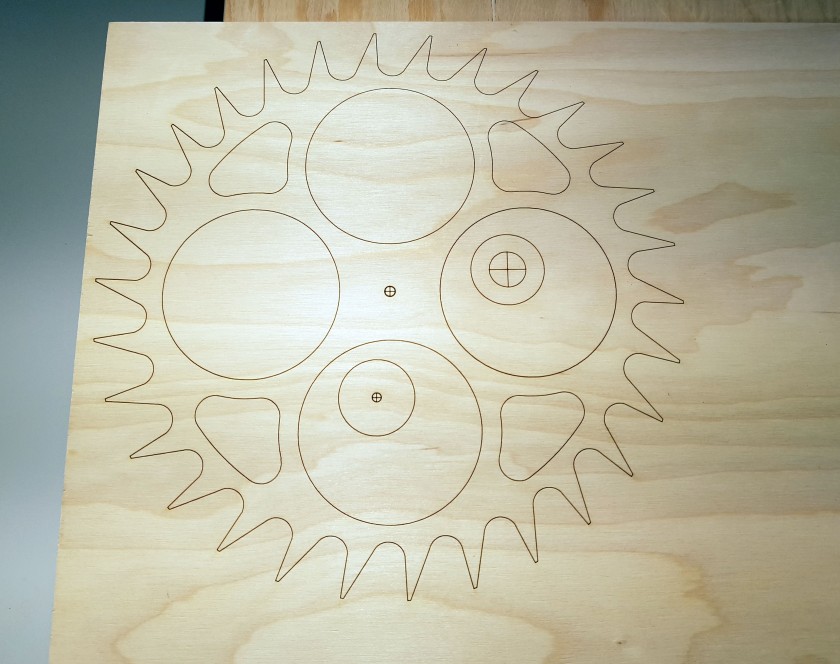
Traced escape wheel.
I also used the laser cutter to make the weight tube. My first choice would be to hollow out a piece of wood on the lathe – but I do not have a large enough lathe. I thus tried to make a box with 8 sides and thus the hexagonal tube was made. I am very happy with the way it turned out mostly because from this I now know to design and make any polyhedron with finger joints, plywood and a laser cutter – soon I will make an icosahedron just for fun!
—
The videos that originally introduced me to wooden clock building was by Drew. More recently I have been watching videos on clock making by Chris from Clickspring.
Who knows, someday I might try my hand at metal gears…
R

awesome work, congratulations, you have a lot of talent and you’re an amazing pro. Do you sell the project to be replicated by other enthusiasts? Do you sell the product ready for those who are interested in buying?
LikeLike
I made only one of these clocks and will not be selling it. The plans are however available from the designer Clayton Boyer (https://lisaboyer.com/Claytonsite/Claytonsite1.htm)
LikeLike
Hi tthanks for posting this
LikeLike